Push notifications are everywhere, from news and messenger apps to fitness and health applications. They are a great tool for increasing user engagement, having a click rate that is 7 times higher than that of email marketing. But be careful not to send too many irrelevant notifications. As this report shows, 50% of app users find push notifications annoying.
With that being said, in this tutorial, I'll show you how to create your own web push notifications, using your own backend with NodeJS and TypeScript, and vanilla JavaScript on the frontend.
I'll go through all the steps you need to take to set up the backend and frontend, but you can skip those parts of course if you're interested in adding push notifications to an existing project.
I uploaded the final code to this GitHub repository.
What you will learn
I'll briefly explain what you need to know about web push notifications before diving into the tutorial, where we'll build a full-stack web application that allows us to broadcast push messages to its users.
The technology we'll be using is:
- JavaScript on the frontend
- NodeJS on the backend (with TypeScript (optional))
- ExpressJS for the API
- MongoDB for storing data (using mongoosejs)
- web-push for sending push messages
Prerequisites
You must be familiar with JavaScript in the frontend and ideally in the backend as well. I included a GitHub repository and commits for each step, so following along is a little easier.
You don't need to have experience with service workers but I recommend you learn more about this topic before working on serious projects.
Watch my PWA online course 📹
You can now watch my course on how to turn your React app into a PWA on Skillshare. Learn what you need to know to get started, and turn your React app into a PWA in just 10 minutes.
Watch it for free with my referral link, which will give you a 14 day trial.
What are web push notifications?

Web push notifications are notifications that the user receives through the browser. These notifications were previously exclusive to native web and desktop applications, but can now be used by websites as well.
To receive a web push notification, the user doesn't need to have the browser or the website open, thanks to the service worker technology, which is an important part of Progressive Web Apps.
The technology behind web push notifications
As the name already gives away, web push notifications are a combination of web push and notifications. You also need to have an active service worker to make this work.
Notification API
The notification API enables websites to show push notifications to the user. You can use this in isolation without the push API if you want to display notifications while the user is browsing your site.
You can display a notification with the following code:
if ('Notification' in window) {
  if (window.Notification.permission === 'granted') {
    new window.Notification('Time is over!');
  }
}
Example code that displays a simple notification to the user. You need to have requested permission first with window.Notification.requestPermission
Push API
The push API allows web apps to receive messages from a server, even when the website is not open. We can use this API to receive messages and then display them, using the notification API.
This API is only available through service workers, which allow code to be executed in the background when the app is not open. I'll explain how to set up a service worker for push notifications in the tutorial, but in case you want to learn more about them, I wrote a few articles on that topic. I recommend that you start with the introduction to the JavaScript API of service workers.
Service worker
Service workers allow code to be executed in the background without user interaction. That's exactly what we need for push notifications since they are supposed to show up even when the user isn't browsing our website.
Browser vendors: The middlemen for sending out push messages
Thanks /Chaphasilor for pointing out that I was missing this!
We need to have our own server for storing and sending out push notifications, but our server can't send the push messages directly to all clients.
Instead, browsers that support web push notifications offer push services, which are completely free of charge. The subscription object that we will send to our backend will contain an endpoint field, which points to the URL of the corresponding vendor.
You can read more about browser vendors in the docs of Mozilla (autopush) and Chrome (Firebase Cloud Messaging).
We'll use the web-push package that handles the communication to those vendors for us.
Tutorial
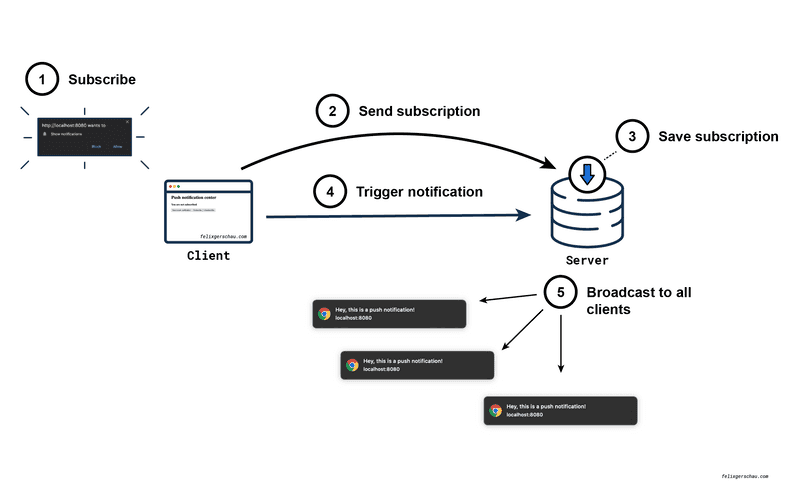
Let's see how this works in practice. As part of the tutorial, we'll write a full-stack application with a simple JavaScript client that can subscribe or unsubscribe from push notifications. The frontend will also be able to trigger a notification that will be sent to all subscribed clients.
If you want to see the final application code, I uploaded it to this GitHub repository. I included the exact commit of this repository for every step, so you can check if your code matches mine in case you run into any issues.
The steps of this tutorial are the following:
- Project setup
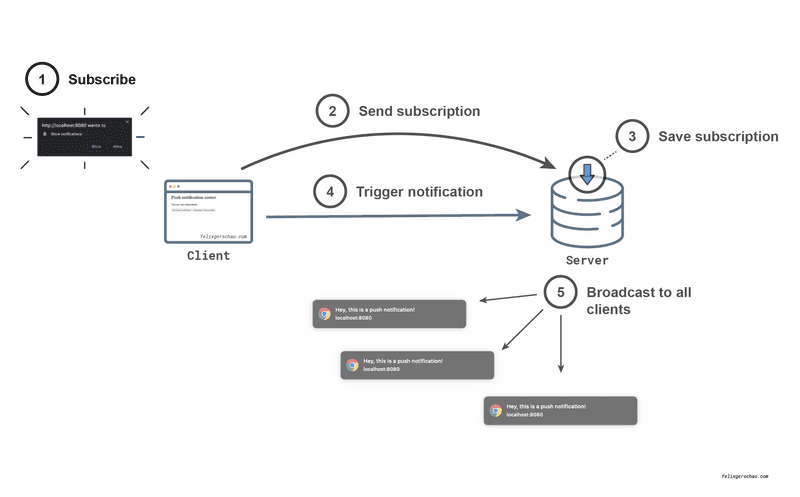
- Subscribe to web push notifications (1)
- Send the subscription to the backend (2)
- Save the subscription (3)
- Send web push notifications to all clients (4) (5)

Project setup
Already have your project set up? Jump to subscribe to web push notifications.
For simplicity, we'll serve the static files of the client application from the express server as well. That's why we start with setting up the backend.
First, we'll create a new folder and initialize npm:
mkdir web-push-notification-app && cd web-push-notification-app
npm init -y
Then we'll install express and create the folders that will hold the files for our client and backend code later on:
npm install --save express
mkdir client app
The app folder will contain all the backend code. Here we'll create an index.ts file that starts the express server:
import express from 'express';
import path from 'path';
import bodyParser from 'body-parser';

const app = express();
const port = 8080; // default port to listen

// Serve all files in client
app.use(express.static(path.join(__dirname, '../../client')));
app.use(bodyParser.json());

// start the Express server
app.listen(port, () => {
  console.log(`server started at http://localhost:${port}`);
});
Set up TypeScript
If you want to use vanilla JavaScript in your backend you can skip this step. I think that, especially in long-term projects, TypeScript makes development so much easier.
npm i --save typescript
npm i --save-dev @types/express
We need to add the following lines to the package.json file, which will compile our TypeScript files to JavaScript. The compiled code
then can be found in the dist folder.
{
  "name": "web-push-notification-app",
  "version": "1.0.0",
  "description": "",
  "main": "dist/app/index.js",  "scripts": {
    "build": "tsc",    "prestart": "npm run build",    "start": "node .",    "test": "echo \"Error: no test specified\" && exit 1"
  },
  "keywords": [],
  "author": "",
  "license": "ISC",
  "dependencies": {
    "express": "^4.17.1",
    "typescript": "^3.9.7"
  },
  "devDependencies": {
    "@types/express": "^4.17.7"
  }
}
We also need to add a tsconfig.json file to the root of the project.
{
  "compilerOptions": {
    "module": "commonjs",
    "rootDir": ".",
    "esModuleInterop": true,
    "target": "es6",
    "noImplicitAny": true,
    "moduleResolution": "node",
    "sourceMap": true,
    "outDir": "dist",
    "baseUrl": ".",
    "paths": {
      "*": [
        "node_modules/*"
      ]
    }
  },
  "include": [
    "app/**/*",
    "config/**/*"
  ]
}
To test that everything is working, we'll add an index.html file to the client folder, which will be statically served by our express server:
<!DOCTYPE html>
<html lang="en">
<head>
  <meta charset="utf-8">
  <title>Hello World</title>
</head>
<body>
  <h1>It's working!</h1>
</body>
</html>
Copy all static files to the output folder
Even though everything is working now, you might have noticed that we accessed the static client files from within the dist folder.
This works if you run the code in development, but as soon as you copy the dist folder to another system for deployment, these folders won't be there
anymore.
As a quick solution for this, I've added a few npm scripts to the build process that copy the client folder to dist.
Let's install the necessary packages for this operation. cpy-cli allows us to copy the static files, mkdirp lets us create folders and rimraf deletes folders.
On Unix-based systems, you could just use cp, rm, and mkdir, but those won't work on Windows machines.
npm install --save-dev cpy-cli mkdirp rimraf{
"name": "web-push-notification-app",
"version": "1.0.0",
"description": "",
"main": "dist/app/index.js",
"scripts": {
"clean": "rimraf dist", "mkdir": "mkdirp dist/client", "copy": "cpy client/* dist/client", "prebuild": "npm run clean && npm run mkdir && npm run copy", "build": "tsc",
"prestart": "npm run build",
"start": "node .",
"test": "echo \"Error: no test specified\" && exit 1"
},
"keywords": [],
"author": "",
"license": "ISC",
"dependencies": {
"express": "^4.17.1",
"typescript": "^3.9.7"
},
"devDependencies": {
"@types/express": "^4.17.7",
"cpy-cli": "^3.1.1", "mkdirp": "^1.0.4", "rimraf": "^3.0.2" }
}In index.ts we need to change the path to the client folder since we now want to use the one that's copied to dist.
import express from 'express';
import path from 'path';
import bodyParser from 'body-parser';

const app = express();
const port = 8080; // default port to listen

app.use(express.static(path.join(__dirname, '../client')));app.use(bodyParser.json());

// start the Express server
app.listen(port, () => {
  console.log(`server started at http://localhost:${port}`);
});
Set up the service worker
As I already mentioned in the first part of this article, we'll need a service worker to be able to receive push notifications from the backend.
In this tutorial, we'll only use a very simple service worker setup, which only serves the purpose of receiving push notifications.
If you want to have a service worker that offers offline capabilities or even a full Progressive Web App, have a look at my other articles on PWAs.
First, we'll create a file called sw.js in the client folder. The code in this file will be executed in the service worker context.
We also need a JavaScript file that registers the service worker. We'll call this file index.js:
// Check if service workers are supported
if ('serviceWorker' in navigator) {
  navigator.serviceWorker.register('/sw.js', {
    scope: '/',
  });
}
In our index.html file, we then need to load this JavaScript file:
<!DOCTYPE html>
<html lang="en">
<head>
  <meta charset="utf-8">
  <title>Hello World</title>
</head>
<body>
  <h1>It's working!</h1>
  <script src="index.js"></script></body>
</html>
That's it!
To verify that the service worker is actually registered, start the application and go to DevTools > Application > Service Worker (in Chrome). You should see a service worker entry with the status "activated".
Subscribe to web push notifications
The first thing we are going to do now is to subscribe to push notification, using the push API. It's available through the service worker registration object, on the push manager.
const subscription = await registration.pushManager.subscribe({
  userVisibleOnly: true,
  applicationServerKey: urlBase64ToUint8Array(publicVapidKey),
});The two fields userVisibleOnly and applicationServerKey are required as part of the options object.
userVisibleOnly
This field is a bit weird since it doesn't serve any practical purpose. Its value indicates that the push subscription will only be used to push messages that are in some way visible to the user.
That means that you're not supposed to use the push message API to do something in the background without the knowledge of the user. Otherwise, developers would be able to track the user's geolocation in the background without them knowing. This is also known as a silent push.
The field always needs to be set to true, otherwise, Chrome will throw an error.
Browsers might also penalize the usage of the push API in the background by unsubscribing users from push.
For us, this means that after receiving a push message, we'll need to show a notification.
There's an open ticket for the push-api spec on GitHub, explaining this pretty well.
applicationServerKey
For security reasons, web push protocol requires messages to be encrypted. This can be done with the Voluntary Application server Identification for web Push (VAPID) specification.
This sounds complicated, but we don't have to do that much.
First, we need to generate a private and public VAPID key. We'll generate those keys with the web-push npm package, we'll use the same package to send push messages from the backend.
$ npx web-push generate-vapid-keys

npx: installed 18 in 4.121s

=======================================

Public Key:
BMrfFtMtL9IWl9vchDbbbYzJlbQwplyZ_fbv8Pei8gPNna_Dr1O-Ng7U7fy0LLqz5RKIxEytTIzyk6TLrcKbN30

Private Key:
E5gpbs9Y6r5TscHC64Ce9-hXojA9I1qQL0kuvX8Jz5Y

=======================================Public key encryption
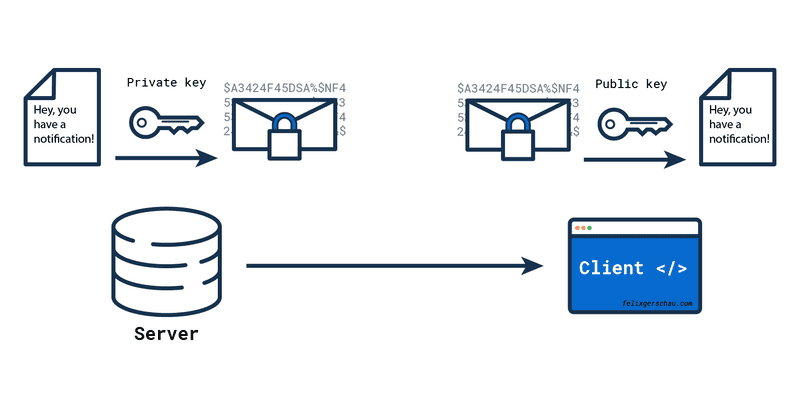
Public-key cryptography is widely used in web development. Anyone with the public key can read a message that's been encrypted with the associated private key.
This gives our messages a digital signature, which means if a client can read the message, they can be sure it was us who sent it to them.
For our use case its important to remember that the private key needs to be kept secret and that we'll only use it on the server side for sending encrypted messages.
The public key allows our client applications to receive and decrypt the encrypted messages.
It's an interesting topic, but let's move on with how to subscribe to push notifications.
Subscribe using the push API
Now that we have our VAPID keys, we can subscribe to push notifications with the push API we saw before.
There's one other thing we need to do before though. The public key, which is a Base64 string, needs to be converted
to an Uint8Array. In the README
of the web-push npm package, they show how to do this. I just copied the urlBase64ToUint8Array function and used it for
transforming the public key.
const publicVapidKey = 'BMrfFtMtL9IWl9vchDbbbYzJlbQwplyZ_fbv8Pei8gPNna_Dr1O-Ng7U7fy0LLqz5RKIxEytTIzyk6TLrcKbN30';

// Copied from the web-push documentation
const urlBase64ToUint8Array = (base64String) => {
  const padding = '='.repeat((4 - base64String.length % 4) % 4);
  const base64 = (base64String + padding)
    .replace(/\-/g, '+')
    .replace(/_/g, '/');

  const rawData = window.atob(base64);
  const outputArray = new Uint8Array(rawData.length);

  for (let i = 0; i < rawData.length; ++i) {
    outputArray[i] = rawData.charCodeAt(i);
  }
  return outputArray;
};

window.subscribe = async () => {
  if (!('serviceWorker' in navigator)) return;

  const registration = await navigator.serviceWorker.ready;

  // Subscribe to push notifications
  const subscription = await registration.pushManager.subscribe({    userVisibleOnly: true,    applicationServerKey: urlBase64ToUint8Array(publicVapidKey),  });};
The subscribe function will be called when the user clicks the subscribe button.
<!DOCTYPE html>
<html lang="en">
<head>
  <meta charset="utf-8">
  <title>Hello World</title>
</head>
<body>
  <h1>Push notification center</h1>
  <button onclick="subscribe()">Subscribe</div>  <script src="index.js"></script>
</body>
</html>Send the subscription to the backend
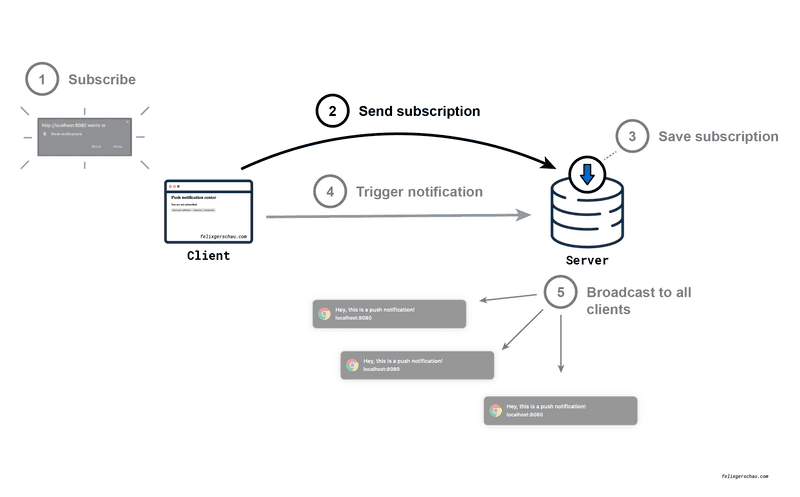
On the backend we'll create a new endpoint for receiving a subscription object and saving it to the database.
On the client, we need to use this endpoint and send the subscription to the backend.
window.subscribe = async () => {
  if (!('serviceWorker' in navigator)) return;

  const registration = await navigator.serviceWorker.ready;

  // Subscribe to push notifications
  const subscription = await registration.pushManager.subscribe({
    userVisibleOnly: true,
    applicationServerKey: urlBase64ToUint8Array(publicVapidKey),
  });

await fetch('/subscription', { method: 'POST', body: JSON.stringify(subscription), headers: { 'content-type': 'application/json', }, });};Save the subscription
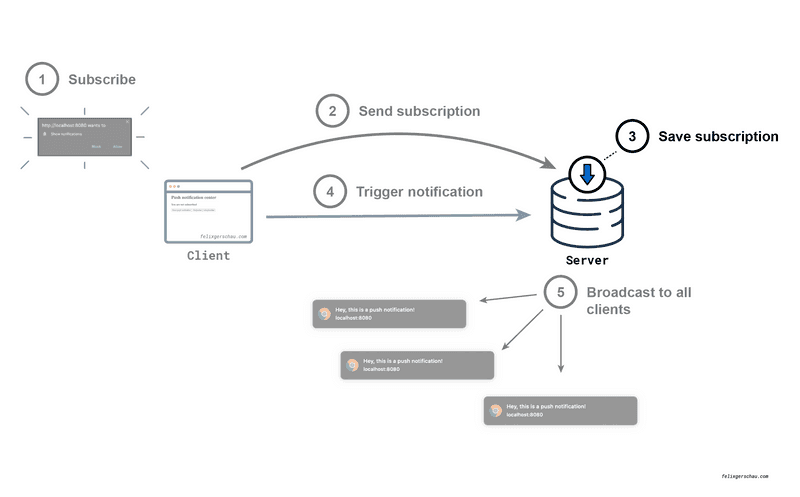
The next step is to save the subscription on the backend.
I'll use MongoDB for this because it's what I'm most familiar with, but feel free to use whatever database technology you prefer.
Set up MongoDB
We'll use Mongoose in conjunction with MongoDB, which offers easy data validation for MongoDB.
Let's first install mongoose and its TypeScript types.
npm i --save mongoose @types/mongooseThen we connect to the database right after starting the server:
import mongoose from 'mongoose';

export default async () => {
  // Connect to the database
  try {
    await mongoose.connect('mongodb://localhost/web-push-notifications', {
      useNewUrlParser: true,
      useUnifiedTopology: true,
    });

    mongoose.set('useCreateIndex', true);
  } catch (e) {
    console.error(`Couldn't connect to the database: ${e}`);
    process.exit(1);
  }
};
The name of the database here is web-push-notifications.
We call this function from the main index.ts file:
import express from 'express';
import path from 'path';
import bodyParser from 'body-parser';
import database from './config/database';
const app = express();
const port = 8080; // default port to listen

app.use(express.static(path.join(__dirname, '../client')));
app.use(bodyParser.json());

database();
// start the Express server
app.listen(port, () => {
  console.log(`server started at http://localhost:${port}`);
});
If you now run the app, you'll likely run into an error. That's because we don't have an instance of MongoDB running yet.
You can either install MongoDB locally on your computer or run it in a docker container. I'll explain the latter here because its easier and faster to do (before doing this, you need to have docker installed and running):
Run MongoDB in a docker container
We need to pull the latest mongo image first, and then run the container like this:
docker pull mongo
docker run -d -p 27017-27019:27017-27019 --name mongo mongo:latest
The -p option is mapping the ports of the container to the ports of your computer.
You'll need to do this only for the first time when you haven't pulled the mongo container yet.
Later on, you can just start the already existing container like this:
docker container start mongoYou can enter the docker container's bash terminal with the following command. Run mongo in there to inspect the database:
docker exec -it mongo bashExecuting npm start should work without any errors now. Next, we are going to save the subscription to the database.
Create a new API endpoint for receiving the subscription
We'll now create a few files for receiving and saving the data to the database:
routes.tsx- That's where we keep all our API routes.subscriptionController- Responsible for handling, sanitizing the received data, and for sending a response.subscriptionRepository- Responsible for all database interaction related to subscriptions.SubscriptionModel- Mongoose model that's used for saving to the database and validating the data.
The directory tree of the app folder will look like this when we're finished:
├── config/
│   └── database.ts
├── controllers/
│   └── subscriptionController.ts
├── index.ts
├── models/
│   └── SubscriptionModel.ts
├── repositories/
│   └── subscriptionRepository.ts
└── routes.tsCreate the mongoose subscription model
As I already said, we're using mongoose for validating the data schema. So first we set up the mongoose model for the subscription:
import mongoose, { Schema, Document } from 'mongoose';

export interface ISubscription extends Document {
  endpoint: string;
  expirationTime?: number;
  keys: {
    auth: string;
    p256dh: string;
  }
}

const SubscriptionModel = new Schema({
  endpoint: { type: String, unique: true, required: true },
  expirationTime: { type: Number, required: false },
  keys: {
    auth: String,
    p256dh: String,
  },
});

export default mongoose.model<ISubscription>('Subscription', SubscriptionModel);
I haven't found a good way of getting the TypeScript interface based on the mongoose model. If you know how to do that, please let me know!
Create the routes and save to the database
We define a new route in the routes file, that will be triggered when the client sends a POST request to /subscription.
import { Express } from 'express';
import {post} from './controllers/subscriptionController';

const initializeRoutes = (app: Express): void => {
  app.post('/subscription', post);
};

export default initializeRoutes;
We handle the above POST request in the subscription controller, which calls the repository to save the subscription.
import { NextFunction, Request, Response } from 'express';
import * as subscriptionRepository from '../repositories/subscriptionRepository';

export const post = async (req: Request, res: Response, next: NextFunction): Promise<void> => {
  try {
    const subscription = req.body;

    const newSubscription = await subscriptionRepository.create(subscription);

    // Send 201 - resource created
    res.status(201).json(newSubscription);
  } catch (e) {
    next(e);
  }
};
Here we save the subscription to the database, using the mongoose model we defined earlier. This will throw an error if the data doesn't match the model.
import Subscription, { ISubscription } from '../models/SubscriptionModel';

export const create = async (subscription: ISubscription): Promise<ISubscription> => {
  const newSubscription = new Subscription(subscription);
  const savedSubscription = await newSubscription.save();
  return savedSubscription.toObject();
};Now is a good time to try the whole thing out and check if everything works as expected.
Restart the app and click the subscribe button. Then check if the network request was successful (under Devtools > Network).
We'll now check the database for any new entries by following the following steps:
First, we'll open the bash terminal of the container.
docker exec -it mongo bashWhen inside the bash terminal, we'll open mongo:
root@0987bb4de8ca:/# mongo...and list all the databases:
> show dbs
admin                   0.000GB
config                  0.000GB
local                   0.000GB
push-notification       0.000GB
web-push-notifications  0.000GB
If web-push-notifications isn't showing up here, the API call wasn't successful.
We can then query all the subscriptions in the database:
> use web-push-notifications
> db.subscriptions.find().pretty()
{
        "_id" : ObjectId("5f381257781feb5659c81f5b"),
        "endpoint" : "https://fcm.googleapis.com/fcm/send/cymNOH07T1U[...]",
        "expirationTime" : null,
        "keys" : {
                "p256dh" : "BLvOQ[...]",
                "auth" : "3jzc-TVOzsceu3CaiLpeJA"
        },
        "__v" : 0
}
Note that you aren't able to successfully do the same request twice. That's because the mongoose model requires the endpoint to be unique.
To delete all subscription run the following command in the mongo shell:
> db.subscriptions.remove({})I added an unsubscribe button and a message that tells me whether or not I am subscribed to the UI. I didn't include it in the tutorial, but you can check out the GitHub commit
Send web push notifications to all clients
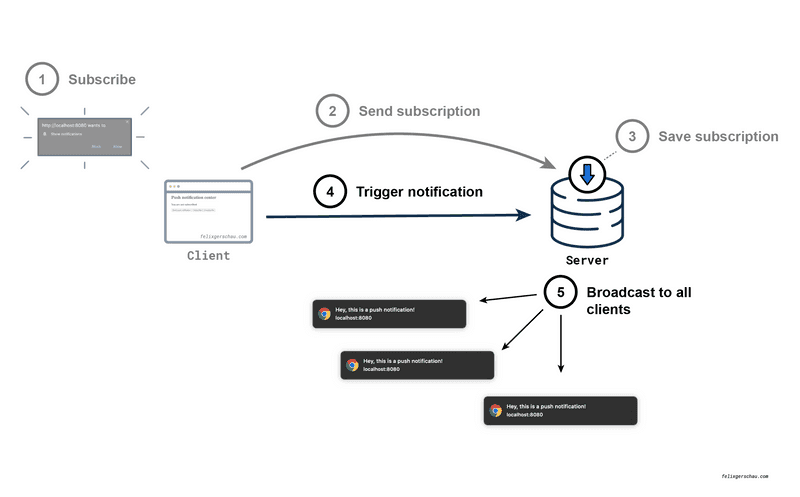
At this point, we have set up a client that uses the push API to subscribe to web push notifications, which we then send to the backend where we store all relevant information.
Now it's time to use this data and send some push notifications to the clients in our database.
On the frontend, we'll send a GET request to /broadcast, which will trigger a notification to all clients.
The frontend
On the frontend we need to do two things:
Trigger a push notification.
Receive and display the push message.
We'll start with the second one:
Handling the push message
In the sw.js file, which we have been neglecting the whole time, we need to write the code that gets executed when we receive a push message.
In the service worker we can listen to the push event and then show a notification:
self.addEventListener('push', (e) => {
  const data = e.data.json();
  self.registration.showNotification(data.title, {
    body: data.body,
    icon: data.icon,
  });
});
Triggering a push message
We'll add a new button, that calls our not-yet-created API endpoint /broadcast.
<!DOCTYPE html>
<html lang="en">
<head>
  <meta charset="utf-8">
  <title>Hello World</title>
</head>
<body>
  <h1>Push notification center</h1>
  <h3 id="subscribed">You are subscribed</h3>
  <h3 id="unsubscribed">You are not subscribed</h3>
  <button onclick="broadcast()">Send push notification</button>  <button onclick="subscribe()">Subscribe</div>
  <button onclick="unsubscribe()">Unsubscribe</button>
  <script src="index.js"></script>
</body>
</html>// ...
window.broadcast = async () => {
await fetch('/broadcast', {
method: 'GET',
headers: {
'content-type': 'application/json',
},
});
};The backend
Setting up web-push
Finally, the moment has come to send out push messages.
To do so we need to install the web-push package:
npm i --save web-push @types/web-pushWe'll configure this in a new config file under config/webpush.ts. I hope you remember your VAPID keys because now you will
need them.
import webpush from 'web-push';

const publicVapidKey = 'BMrfFtMtL9IWl9vchDbbbYzJlbQwplyZ_fbv8Pei8gPNna_Dr1O-Ng7U7fy0LLqz5RKIxEytTIzyk6TLrcKbN30';
const privateVapidKey = 'E5gpbs9Y6r5TscHC64Ce9-hXojA9I1qQL0kuvX8Jz5Y';

export default (): void => {
  webpush.setVapidDetails(
    'mailto:[email protected]',
    publicVapidKey,
    privateVapidKey,
  );
};
The email is required and needed in case your VAPID keys have been abused and the browser vendor needs to contact you.
We need to call the function in the main index.ts file:
import webpush from './config/webpush';
// ...
webpush();
// ...
Now web-push is set up and ready to use for sending out push messages.
Using web-push to send push messages
We'll first set up our new route, which calls the broadcast function of our controller.
import { Express } from 'express';
import { post, remove, broadcast } from './controllers/subscriptionController';

const initializeRoutes = (app: Express): void => {
  app.post('/subscription', post);
  app.delete('/subscription', remove);
  app.get('/broadcast', broadcast);};

export default initializeRoutes;
In the controller we'll first fetch all subscriptions and then send a notification to all of them:
export const broadcast = async (
  _req: Request,
  res: Response,
  next: NextFunction,
): Promise<void> => {
  try {
    const notification = { title: 'Hey, this is a push notification!' };

    const subscriptions = await subscriptionRepository.getAll();

    const notifications: Promise<SendResult>[] = [];
    subscriptions.forEach((subscription) => {
      notifications.push(
        webpush.sendNotification(subscription, JSON.stringify(notification))      );
    });
    await Promise.all(notifications);

    res.sendStatus(200);
  } catch (e) {
    next(e);
  }
};The function for getting all subscriptions is the following:
// ...
export const getAll = async (): Promise<ISubscription[]> => {
  const subscriptions = await Subscription.find();
  return subscriptions;
};If you run the application and refresh the page, you should see a notification like this one after clicking the broadcast button.
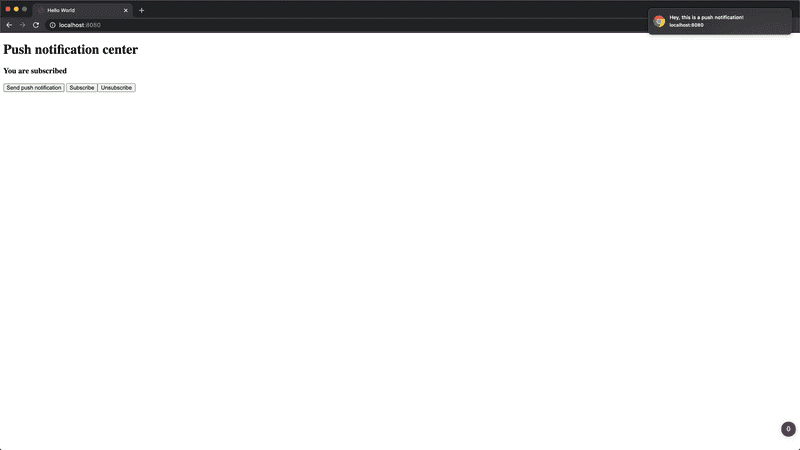
That's it, congratulations for following through with the tutorial and creating your first web push notification! 🥳
Customize your notification
With this app, we're sending the most basic version of a web push notification possible. You can customize those notifications further by adding an icon, a body text, actions, and more.
You can check out this notification generator, which lets you play around with all the possible features.
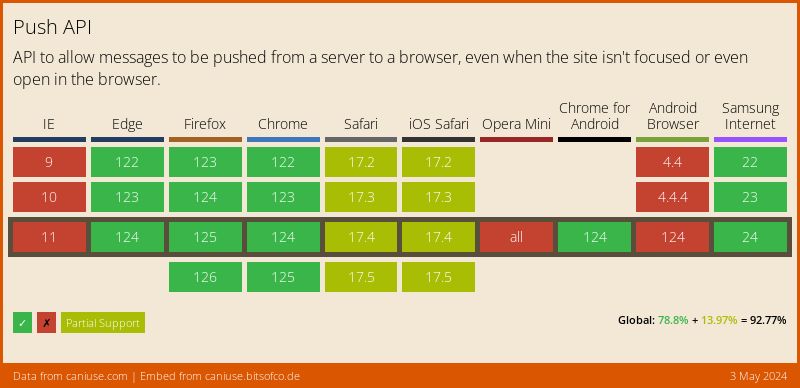
Browser support for web push notifications
As you may have already noticed, this doesn't work on Safari desktop. Even though Safari offers the possibility to display notifications, it doesn't support the current standard.
You can use window.safari.pushNotification for that, which requires you to register with a developer account before being able to use it.
Conclusion
Implementing web push notifications is one of the more complicated features of Progressive Web Apps since it requires some backend work to be done. However, if you already have a backend for your project, the process is pretty straight forward.
The resulting project isn't complete by any means, since there's no UI for sending custom notifications. Nevertheless, I hope this served as a good starting point for future developments related to web push notifications.
If you liked this tutorial, I'd be happy if you subscribed to my newsletter, where you'll get updates about my latest content and links to articles about PWAs, React, and frontend programming.
I explained the steps in this tutorial a little more in detail than usual. Let me know if you liked that or not in the (new) comment section.
Further reading
My articles on Progressive Web Apps
- My other articles and tutorials on Progressive Web Apps
- Service Workers Explained - Introduction to the JavaScript API
- How to make your React app a Progressive Web App (PWA)
- High Performance Mobile Web by Maximiliano Firtman - Book review and personal notes
References
Web push notifications - Google developer blog
Use TypeScript to Build a Node API with Express
This helped me setting up the backend. Until now, I've always used JavaScript in the backend.
