The tutorial includes setting up a Service Worker with Webpack and Workbox, making it work with TypeScript and ESLint, adding a manifest with icons for your home and splash screen, and finally, making your PWA compatible with iOS devices.
At the beginning of this year, I started working on a project in my company where I would transform a ReactJS application for booking events into a Progressive Web App. When I started to look into the topic, I couldn't find a resource that explained all the things I needed to know to get started and that would cover the entire process of converting an existing ReactJS application into a Progressive Web App at a production-ready state.
I'll first explain to you the things you need to know about Progressive Web Apps to get started and afterward, I'll walk you, step by step, through the process of making your ReactJS app a Progressive Web App.
If you follow along with the tutorial and there are any open questions or you got stuck, don't hesitate to contact me. You can find my contact information at the bottom of this page.
If you still need to sell the people at your company on developing a Progressive Web App, check out this link, which provides lots of case studies that show that Progressive Web Apps increase customer retention, performance, and mobile experience.
Prerequisites
This tutorial is for you if...
- you want to get into Progressive Web Apps but don't know where to start.
- you want to get a better understanding of PWAs and of the terms around them.
- you want to make your React app a Progressive Web App.
- you are using Webpack for bundling your code.
Watch my PWA online course 📹
You can now watch my course on how to turn your React app into a PWA on Skillshare. Learn what you need to know to get started, and turn your React app into a PWA in just 10 minutes.
Watch it for free with my referral link, which will give you a 14 day trial.
Tools
Webpack
Webpack is a static module bundler for JavaScript that we use for bundling our React project.
Create-React-App already uses Webpack under the hood, but having your own Webpack configuration gives you more control over the Service Worker.
Workbox
Workbox is a set of libraries, developed by Google, that facilitates setting up a Progressive Web App.
We will be using their Webpack plugins for generating a precache manifest.
TypeScript
TypeScript extends JavaScript by adding types to the language. TypeScript speeds up your development experience by catching errors and providing fixes before you even run your code.
Terminology
Before we jump right into the tutorial, I want to explain the most important terms and concepts around Progressive Web Apps. This will help you during the tutorial to understand what we are implementing, as well as later on when fighting bugs or adding new features. If you are already familiar with these terms you can skip this part, but I encourage you to at least skim over the headlines.
Application Shell
This is a term you maybe don't know yet, but as a React developer, you are most likely already familiar with the concept behind it.
The application shell describes the minimal amount of code that is required to run your application. This doesn't include any dynamic data fetched from the API.
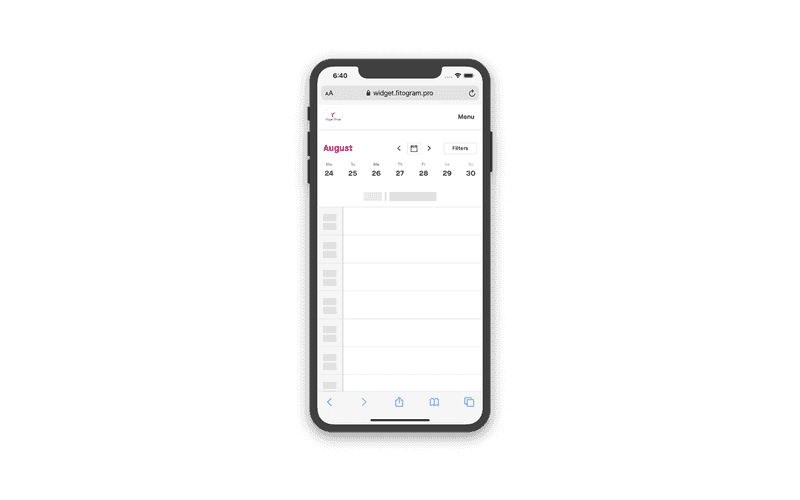
In other words, as Addy Osmani puts it: The app shell is similar to the bundle of code that you'd publish to an app store when building a native app.
Progressive Web App
A Progressive Web App (PWA) is an application that expands the functionality of a regular website progressively by adding features that previously were exclusive for native applications. Such features include offline capabilities, access through an icon on the home screen, or push notifications.
It's a web-app that looks and feels like a native app but uses web-technologies.
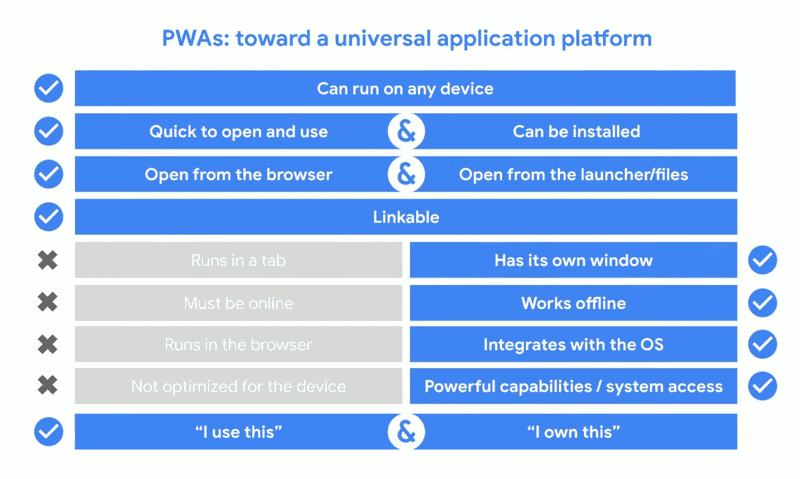
The installation process of a PWA doesn't involve an app store. It's installed directly through the browser.
PWAs are supported both on mobile and desktop browsers. As of writing this, all major browsers offer at least basic support. Chrome offers full support on mobile and desktop, Safari and Firefox allow PWAs to be installed only on mobile. All major browsers offer support for Service Workers, which is the core-technology powering PWAs. Check out this article if you want to know more about the state of PWAs in 2020.
Progressive Web Apps are a progressive enhancement of your app. This means that even though not all features are available on all platforms, the worst case is that people will use your page as a simple website.
The two very essential features that a Progressive Web App should have is a Service Worker and a manifest (and the equivalent meta tags on iOS for full compatibility).
We'll now have a close look at what these two things are:
Service Worker
Service Workers are the core-technology behind PWAs. They are an extension of Web Workers. They enable native features like an offline experience or push notifications.
Just like Web Workers, Service Workers allow JavaScript code to be run in the background. But they have a few additional capabilities. Service Workers don't stop when the current tab is closed, which is crucial for offering push notifications.
Another important feature is that they can intercept network requests. This is important for adding offline capabilities to our app.
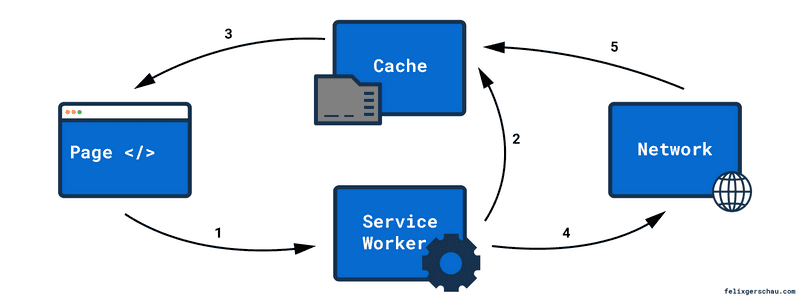
What we see here is Workbox's "Stale-While-Revalidate" caching strategy.
Let's see how this works more in detail:
Lifecycle
A Service Worker has different states it goes through before and after controlling your page. The browser will compare any new Service Worker file to the old one.
If there are any changes, the new version will eventually control the page. By default, a new Service Worker will keep waiting until all tabs of the browser with the website open are closed. There are a few ways you can force the Service Worker to update faster, I explain this in another tutorial about how to create a PWA update notification.
It's important to disable caching on the Service Worker file, so new Service Worker versions can be detected immediately.
You can do so by setting the max-age header to 0. How to do this exactly depends on your CDN and server configuration.
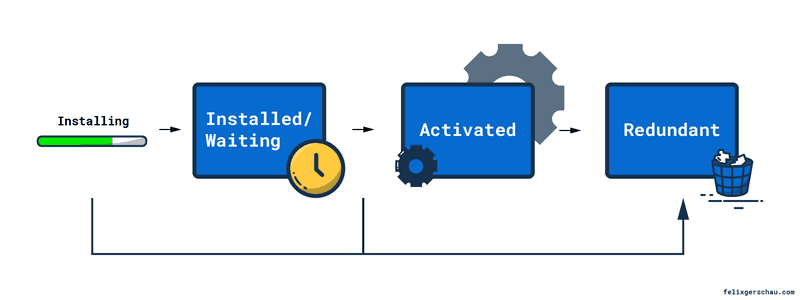
If a Service Worker is activated this means that it's controlling the page.
You can see the current state of your Service Workers in the Application tab of the Chrome dev-tools.
Caching strategies
The caching strategies of Service Workers define how our app is going to behave when a network is available or not.
Workbox, which is a tool we'll use for creating our PWA, offers the following caching strategies. If no caching strategy is defined, Workbox will use the cache-first strategy by default.
I adapted the illustrations from the Workbox documentation (here).
Stale-While-Revalidate

The Service Worker will serve the cached assets first and update the cache with the latest version afterward.
Cache First
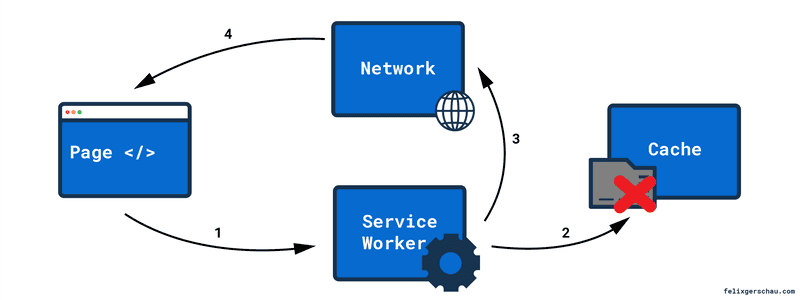
The Service Worker will serve the cached assets and will only query the network if the cache is not available.
Note that contrary to stale-while-revalidate this strategy doesn't update the cache in the background.
Network First
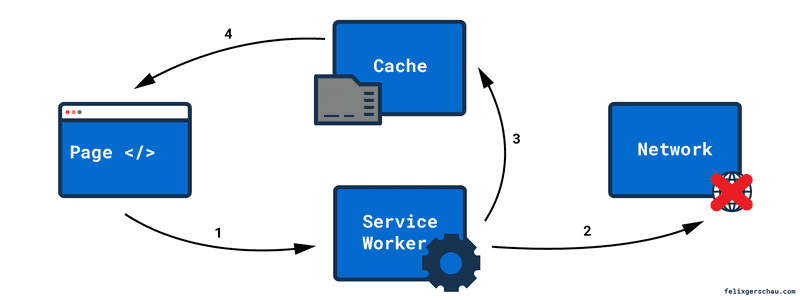
The Service Worker will only use the cache if the network request fails.
Network Only
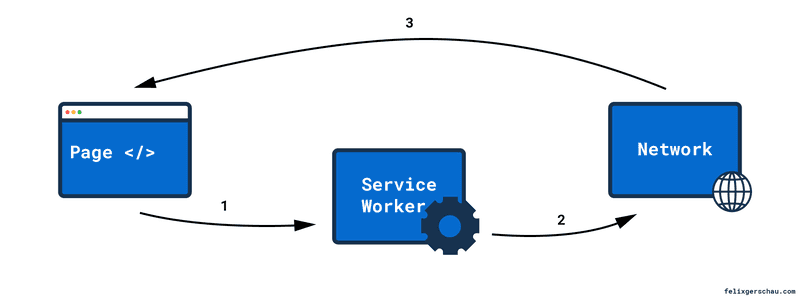
The Service Worker will always get the assets from the network.
Workbox also allows you to have a cache only strategy. Since there aren't many use-cases for this, I didn't include it in this overview.
Web App Manifest
Having a Service Worker controlling your page is one important part of PWAs, but it's only half of the equation. Only installing a Service Worker will give your site offline capabilities and the possibility to add push notifications, but it still lacks the "look and feel" of a native application.
That's where the Web App Manifest comes into play. It's a JSON file called manifest.json, located at the root of your project.
With this file, you'll be able to add a splash screen, name, icons, and more to your app.
Let's have a look at what are the essential fields for a PWA:
name and short_name
The short name is what will be displayed on the home screen below your icon. The full name will be used in the android splash screen.
start_url
The entry point of the installed app.
display
Possible values are
fullscreen,standalone,minimal-ui, andbrowser. You probably want to usefullscreen, which will make the URL-bar disappear.icons
These will be used for the app icon and the generated splash screen.
theme_color
This affects how the operating system displays the application. For example, this color can be used in the task switcher.
background_color
This color will be shown while the application's styles are loading.
Be aware that the manifest is not fully compatible with iOS right now. On iOS, you'll need to specify the equivalent meta or link tags for these fields.
I'll explain what tags you need to add in the tutorial later on.
Debugging
To see whether your page's PWA capabilities are fully working there are a few places you can check in the Chrome DevTools:
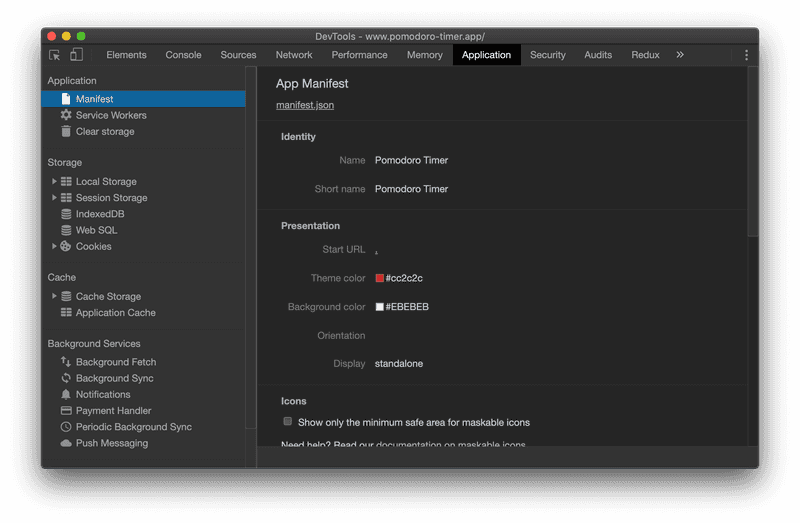
Manifest
Under Application -> Manifest you can see what fields are missing or have invalid values:
Audit
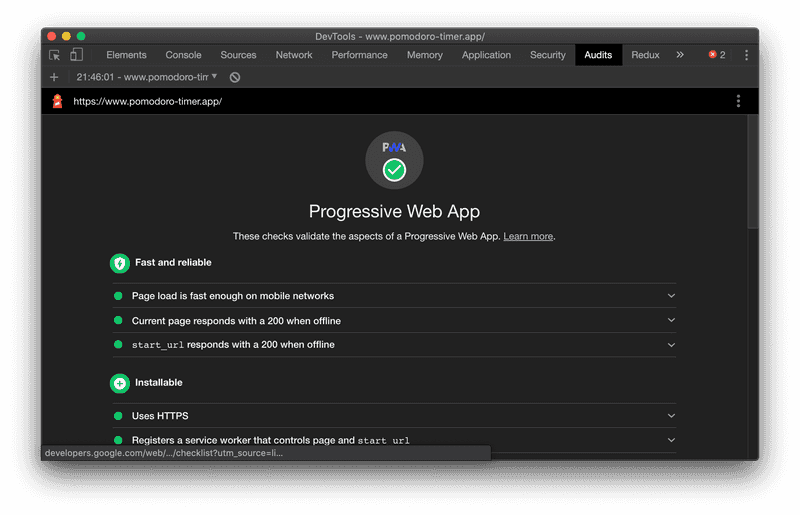
In the audit tab of the DevTools, you're able to generate a lighthouse report. Make sure to select the "Progressive Web App" checkbox before hitting the Generate report button.
This is not a 100% safe way of telling that your app is compatible with all devices. For example, it's not testing the existence of
all meta tags on iOS that are the counterpart to the manifest.json on Android.
Additionally, you should manually test on iOS devices and other browsers than Chrome.
Service Worker
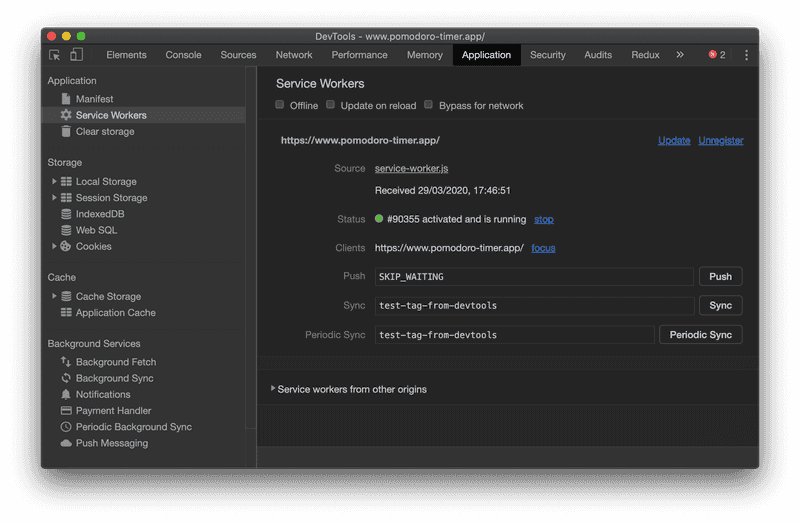
You can check the state of your website's Service Workers by opening the Google Chrome DevTools and navigating to
Application -> Service Workers.
If there are any Service Workers related to the current origin, they will show up here.
Each Service Worker will give you information about its current lifecycle in the Status field. You are also able to
update or unregister the Service Worker, as well as interacting with it by sending messages with the Push input field.
Network tab
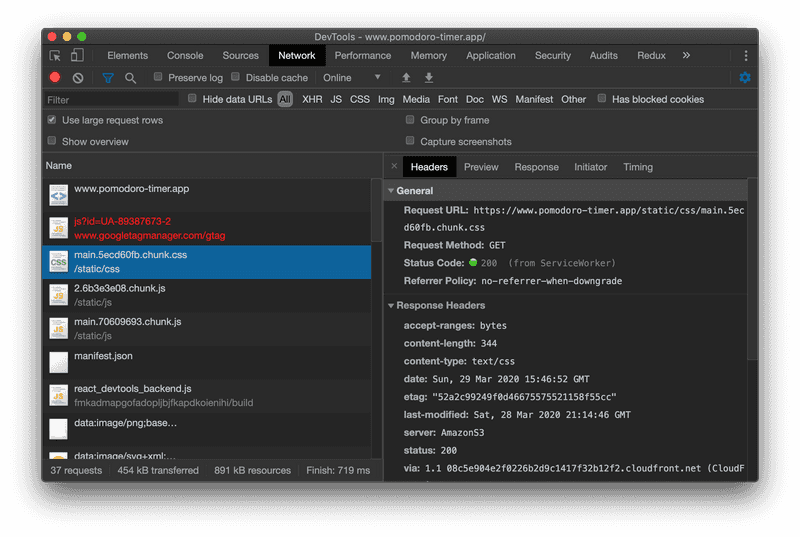
You can see which requests have been served from the cache by checking the network tab. The requests served by the Service Worker have a status code 200 with a note, saying "from Service Worker" in parenthesis.
Get notified about new tutorials
Join over 1,000 developers who receive React and JavaScript tutorials via email.
No spam. Unsubscribe at any time.
Tutorial
Now that you know the most important concepts about PWAs, we can start with the tutorial.
I will show everything you need to do with code examples in the next steps, but if you want to see the entire example project, you can check it out here.
I will highlight the code you need to add to your already existing project, but if you start a new project you can copy the setup of my example project.
Service Worker Setup
Webpack
For setting up the Service Worker we will be using Workbox. Workbox offers two Webpack plugins: injectManifest and generateSW.
generateSW is the easiest way to get your site up and running by automatically creating a service-worker.js file with precaching for you.
This is useful if you don't need to customize the Service Worker code too much, as you rely on the plugin's options for any modifications.
injectManifest allows you to create your own Service Worker file. For example, I needed to use for creating an update notification
for my pomodoro timer app.
In this tutorial, I'll show you how to use the latter since it's more complicated to set up. If you prefer to go with the easier approach,
you can check out the Workbox documentation, use generateSW,
and come back here to continue later.
yarn add -D workbox-webpack-pluginThen we can use it in our webpack.config.js file to create a Service Worker.
const { InjectManifest } = require('workbox-webpack-plugin');

module.exports = (env, argv) => {
  // other setup
  plugins: [
    ...(argv.mode === 'production' ? [
      new InjectManifest({
        swSrc: path.resolve(
          __dirname,
          // we'll create this file later on
          './service-worker/serviceWorkerWorkbox.js',
        ),
        // this is the output of the plugin,
        // relative to webpack's output directory
        swDest: 'service-worker.js',
      }),
  ] : [],
  // remaining plugins
};That's all we have to change in our Webpack configuration for now.
Create the Service Worker file
Now we need to create the Service Worker file that injectManifest will transform into a Service Worker JavaScript file with precaching,
which the browser can understand.
The first version of our Service Worker then looks somthing like this:
yarn add workbox-precaching workbox-routingimport { createHandlerBoundToURL, precacheAndRoute } from 'workbox-precaching';
import { registerRoute, NavigationRoute } from 'workbox-routing';
const precacheManifest = [].concat(self.__WB_MANIFEST || []);
precacheAndRoute(precacheManifest);
const handler = createHandlerBoundToURL('/index.html');
const navigationRoute = new NavigationRoute(handler, {
denylist: [/^\/_/, /\/[^/?]+\.[^/]+$/],
});
registerRoute(navigationRoute);Going through the code, the first step is precaching the files that Webpack generates.
self.__WB_MANIFEST is being added to the scope by the injectManifest plugin. It's an array that contains all files that are being precached,
as well as a revision field, which tells the browser the version of this file and is being autogenerated.
At this point, we can also see the importance of Workbox in our setup. Without it, it would be much harder to create the precache manifest, since most of the filenames of Webpack's output are hashed, and therefore change with every build.
precacheAndRoute will now take control over these resources and all future requests will go to the Service Worker instead of requesting them from
the server.
The next step is adding a NavigationRoute and a handler for our index.html file.
We need this because our React application will serve the index.html file for all routes that don't
access a specific resource. Your application might contain routes like /about which React responds to with the index.html file.
All request that haven't been precached will now respond with the index.html file.
import { createHandlerBoundToURL, precacheAndRoute } from 'workbox-precaching';
import { registerRoute, NavigationRoute } from 'workbox-routing';
import { skipWaiting, clientsClaim } from 'workbox-core';skipWaiting();clientsClaim();
const precacheManifest = [].concat(self.__WB_MANIFEST || []);
precacheAndRoute(precacheManifest);

const handler = createHandlerBoundToURL('/index.html');
const navigationRoute = new NavigationRoute(handler, {
  denylist: [/^\/_/, /\/[^/?]+\.[^/]+$/],
});
registerRoute(navigationRoute);
Here I've added skipWaiting and clientsClaim.
skipWaitingtells the Service Worker to skip the waiting state and become active.clientsClaimwill make the Service Worker control the all clients right away (even if they're controlling other tabs or windows). Without this, we could be seeing different versions in different tabs or windows.
Get it working with TypeScript
Since I'm using TypeScript in the rest of the source code, it makes sense to use it for the Service Worker file as well.
We'll need to set up a separate tsconfig.json file for the Service Worker because the Service Worker scope has access to different variables.
For example, you aren't able to access the window object from within a Service Worker.
TypeScript offers the webworker library, which we will add to our Service Worker file. In the current folder structure, we'll add one tsconfig.json
file at the root of the project, which contains all the common settings. In the src and service-worker folder, we'll then add config files that extend
the base file.
.
├── tsconfig.json/├── service-worker/
│   ├── serviceWorkerWorkbox.ts
│   └── tsconfig.json└── src/
    ├── App.tsx
    ├── index.tsx
    ├── styles.scss
    └── tsconfig.json
The base config file then contains all the shared settings, in addition to a reference to the location of the other config files and the field composite
set to true.
{
  "compilerOptions": {
    "composite": true,    "outDir": "./dist",
    "rootDir": ".",
    "sourceMap": true,
    // and more settings
  },
  // ...
  "references": [    { "path": "./service-worker" },    { "path": "./src" }  ]}
The other two config files then extend the previous one. Only the Service Worker file will add the TypeScript library webworker.
{
  "extends": "../tsconfig.json",  "compilerOptions": {
    "lib": ["es6", "es2017", "esnext.intl", "es2017.intl", "es2018.intl", "webworker"]  },
  "include": ["./**/*"]
}{
"extends": "../tsconfig.json", "compilerOptions": {
"lib": ["es6", "dom", "es2017", "esnext.intl", "es2017.intl", "es2018.intl"] },
"include": [
"./**/*"
],
"exclude": ["../service-worker/**/*"]
}Now there's one last thing we need to add to our Service Worker file:
/// <reference lib="webworker" />import { createHandlerBoundToURL, precacheAndRoute } from 'workbox-precaching';
import { registerRoute, NavigationRoute } from 'workbox-routing';
import { skipWaiting, clientsClaim } from 'workbox-core';

// ServiceWorkerGlobalScope is a type from the workbox-precaching module
declare const self: Window & ServiceWorkerGlobalScope;
skipWaiting();
// ...
The reference to the TypeScript library will tell the TypeScript compiler to use the scope of the webworker library instead of the default one. You just need to add it to the top of the file.
We also expand the global definition of self and add the Service Worker scope to be able to use self.__WB_MANIFEST, which is being injected
by Workbox. Workbox provides these typings for us in the workbox-precaching module.
Now we need to change the extension of the Service Worker file in the Webpack config and we're done setting up TypeScript:
new InjectManifest({
  swSrc: path.resolve(
    __dirname,
-   './service-worker/serviceWorkerWorkbox.js',
+   './service-worker/serviceWorkerWorkbox.ts',
  ),
  swDest: 'service-worker.js',
}),
...and ESLint
Getting ESLint to work with two different TypeScript versions isn't very obvious, that's why I included this in the tutorial as well.
ESLint allows you to adjust the parser options for multiple TypeScript configurations like this:
"parserOptions": {
  "project": ["src/tsconfig.json", "service-worker/tsconfig.json"],
  "sourceType": "module"
},
Register the Service Worker
Now, when we run the build in our project, Webpack should create a service-worker.js file relative to the output directory (usually dist).
But there's an important part missing: Our React application still doesn't register the Service Worker.
We can do this by adding the following to our React code, preferably somewhere, where it will always be executed:
navigator.serviceWorker.register('/service-worker.js')We should also check if the browser supports Service Workers and load the Service Worker after the page loaded since it's not necessary for the page to render:
export function register() {
  window.addEventListener('load', () => {
    if ('serviceWorker' in navigator) {
      navigator.serviceWorker.register('/service-worker.js')
    }
  }
}
In the example project, I used the configuration of Create React App, which adds a few more configuration options and checks for development but it basically does the same.
That's everything we need to do for adding Service Workers to our React application.
Now I'll show you how to add a manifest.json file.
Adding a manifest file
We'll now enable the "look and feel" of a native app by adding a Web App Manifest.
First, we create a manifest.json file at public/manifest.json:
{
  "short_name": "React PWA App",
  "name": "React PWA App",
  "icons": [
    {
      "src": "/icon-192x192.png",
      "sizes": "192x192",
      "type": "image/png"
    },
    {
      "src": "/icon-512x512.png",
      "sizes": "512x512",
      "type": "image/png"
    }
  ],
  "start_url": ".",
  "display": "standalone",
  "theme_color": "#066ace",
  "background_color": "#202020"
}For Android, you need at least 2 icons in the resolutions 192x192 and 512x512. The image can be cropped by the operating system to
fit the standard icon blueprint.
You can see if your icon fits the safe area in the DevTools under Application -> Manifest and selecting "Show only the minimum safe area for
maskable icons".
If you want to create your own maskable icon, you can do so with the maskable editor.
The icons and the manifest should both be located in the public folder. If you haven't set it up already, you need to make sure that all files
of this folder will be copied to the output folder. We do this using the webpack-copy-plugin.
yarn add -D copy-webpack-pluginnew CopyWebpackPlugin({
patterns: [
{ from: path.resolve(__dirname, './public') },
],
}),Now the last thing we need to do is telling the browser where to find the manifest file by adding a link tag to the header:
<link rel="manifest" href="/manifest.json">If you followed the tutorial up to this point, your app should now be installable on Android devices. You can go ahead and try it out.
Now we're going to add full support for iOS.
Making it iOS compatible
Luckily, iOS supports the most important features of Service Workers, which means we don't need to do any additional work there.
It only partially supports the manifest.json file we created before. We now need to add the same information that this file contains in
the form of meta and link tags that iOS understands.
All those tags will be added to the head of the document:
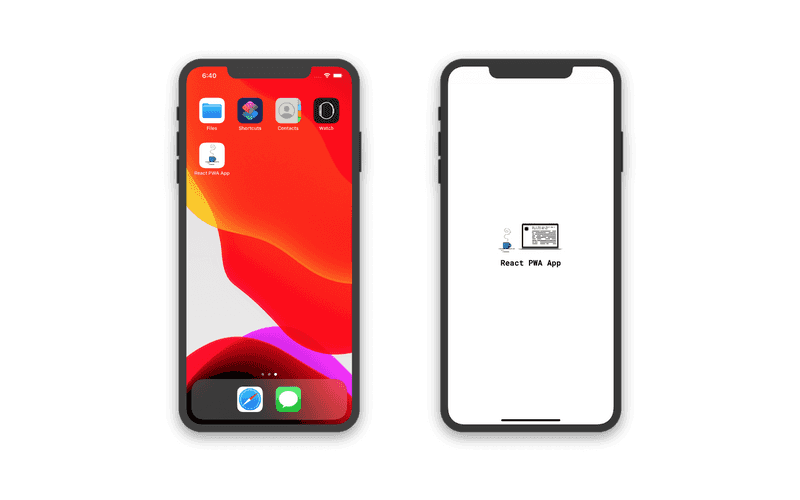
Home screen icon
<link rel="apple-touch-icon" href="/icon-192x192.png">Fullscreen mode
<meta name="apple-mobile-web-app-capable" content="yes">Splash screen
For supporting splash screens on iOS we need to provide images with the exact dimensions of every iOS device out there, for portrait and landscape mode.
This may feel like a near-to-impossible task but with the pwa-asset-generator CLI, it's actually not that hard:
npm i -g pwa-asset-generator
cd public
pwa-asset-generator ./icon-512x512.png ./ --splash-onlyThis command will auto-generate all splash screens that you need for full iOS compatibility and place them right into your public folder.
Now you just need to include the link tags in your index.html file. You should see them in your terminal after executing
the pwa-asset-generator command above.
  <link rel="apple-touch-startup-image" href="apple-splash-2048-2732.jpg" media="(device-width: 1024px) and (device-height: 1366px) and (-webkit-device-pixel-ratio: 2) and (orientation: portrait)">
  <link rel="apple-touch-startup-image" href="apple-splash-2732-2048.jpg" media="(device-width: 1024px) and (device-height: 1366px) and (-webkit-device-pixel-ratio: 2) and (orientation: landscape)">
  <link rel="apple-touch-startup-image" href="apple-splash-1668-2388.jpg" media="(device-width: 834px) and (device-height: 1194px) and (-webkit-device-pixel-ratio: 2) and (orientation: portrait)">
  ...
Conclusion
I hope you found this tutorial useful and that you are now able to convert your React applications into PWAs. If it helped you converting an existing project, personal or professional, I'd love to hear about it on Twitter or via Email.
If there are any open questions, feel free to reach out to me and I'll update this tutorial with more useful information.
I recommend you subscribe to my email list if you are interested in React, PWAs, or performance.
You might also want to check out my tutorial on how to create an update notification for your PWA.
