Watch my PWA online course 📹
You can now watch my course on how to turn your React app into a PWA on Skillshare. Learn what you need to know to get started, and turn your React app into a PWA in just 10 minutes.
Watch it for free with my referral link, which will give you a 14 day trial.
When I first heard about progressive web apps (or PWAs) and their offline capabilities, the first question that came to my mind was how to gain control over which version the user is seeing.
What if an urgent bug-fix needs to be shipped as soon as possible to all users?
Here I'll first go over some basic concepts regarding progressive web apps and then I'll explain how to implement an "update available" notification for the user.
If you want to know more about PWAs, I recommend you check out my complete guide to Progressive Web Apps with React.
If you have any open questions, feel free to hit me up on Twitter or via Email (link in the footer).
Recently, I made a personal project of mine open-source, which also implements an update notification. Check it out here.
Concepts around PWAs
App shell
In single-page applications without server-side rendering, usually, the first thing being loaded is the application code, which then populates the app with data fetched from the API. This is also called app shell architecture.
In other words, the "app shell" is everything that you would normally download from a mobile app store. In progressive web apps, we cache the app shell with service workers.

Caching strategies
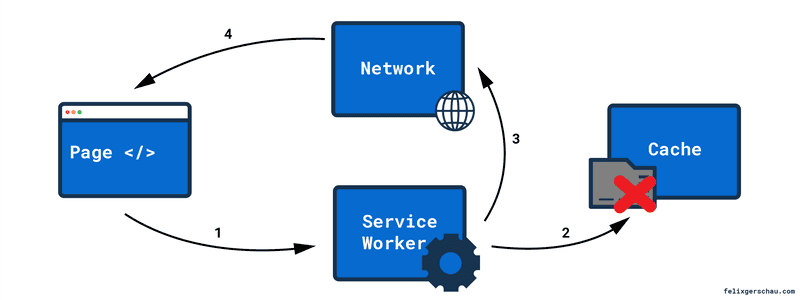
Different caching strategies can be selected when working with progressive web apps and service workers. The most widely used strategy is the cache first strategy, which first serves the application from the Service Worker cache to ensure a fast and consistent user experience.

This is the default caching strategy when implementing service workers.
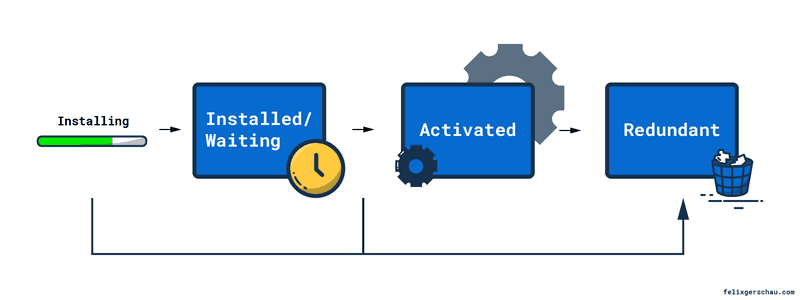
To get a better understanding of how the application shell update works and at which point we can show the update notification to the user, it's important to have an overview of the lifecycle of a Service Worker:
Service Worker lifecycle

When a Service Worker is being installed for the first time, it runs through all these states directly until it's Activated.
However, when a new version is getting installed, it will get stalled in the Installed/waiting state, waiting for getting activated.
Now we can get the Service Worker to become active in a few different ways:
1. Close all tabs and open the website again
The Service Worker won't automatically pass on to available unless you close all open tabs of this domain.
2. Call skipWaiting in the service-worker.js
This tells the Service Worker to install and activate new versions as soon as they are available.
3. Call skipWaiting on user interaction
That's when the user clicks on the button of the banner we'll provide.
Service Workers in Create-React-App
In Create React App you might have noticed that it already comes with a serviceWorker
file.
Behind the scenes, CRA is using Workbox, a tool developed by Google that handles all the set up with an easy to use API. CRA is using its GenerateSW webpack plugin.
This plugin autogenerates a file called service-worker.js, which already precaches all your static assets.
This means you'll have two files:
- One file that registers the Service worker, called
serviceWorker.js(or.tsif you use TypeScript). You can find this file in thesrcfolder. - One service worker file that is autogenerated and which you can't modify (served as a static asset under
/service-worker.js).
You aren't able to modify the autogenerated Service Worker file, but you can see the source code in the browser's DevTools > Sources > service-worker.js. You can also see it under
localhost:8080/service-worker.js
The serviceWorker.ts file then registers this Service Worker with this code:
navigator.serviceWorker.register('/service-worker.js')Here we register the autogenerated service-worker.js file.
The part of the autogenerated service worker file that's most interesting to us is the following, which lets us tell the service worker to skip waiting and become active.
self.addEventListener('message', (event) => {
  if (event.data && event.data.type === 'SKIP_WAITING') {
    self.skipWaiting();
  }
});
Please note that the notification will only show when the user refreshes the page. It won't show if you release an update while the user is browsing your page. Without this notification, your users will get the new version after refreshing and closing all tabs and opening the site again. Check out my article on the service worker lifecycle if you want to learn more about this.
Debugging
Before we continue with the actual implementation it makes sense to talk about how to work with this while developing. Create React App does a good job explaining this.
You need to run npm run build followed by serve -s build.
For triggering updates I found it easier to edit the Service Worker file at build/service-worker.js.
Adding a console.log statement already triggers an update since it changes the file hash.
Implementation
So now that we had a look at the necessary theory behind service workers, we can start implementing the update notification. For this, we need to do two things:
- Check if an update is available and show the notification
- Tell the service worker to skip waiting and reload the page
Check if an update is available
Luckily, the register function of the Service Worker also provides an onSuccess and onUpdate
callback. onUpdate will only be called when a new Service Worker has been successfully installed.
We can leverage this callback for adding the code that triggers the update notification. Before that
we need to remove the registration call from the index.tsx to not call it twice:
const [showReload, setShowReload] = useState(false);
const [waitingWorker, setWaitingWorker] = useState<ServiceWorker | null>(null);

const onSWUpdate = (registration: ServiceWorkerRegistration) => {
  setShowReload(true);
  setWaitingWorker(registration.waiting);
};

useEffect(() => {
  serviceWorker.register({ onUpdate: onSWUpdate });
}, []);
Make sure this component is always rendered, otherwise, the Service Worker won't get registered!
registration.waiting refers to the new worker. We save this Service Worker in the
state of the component to use it to skip waiting in the second step.
In case you were wondering: This example is using React hooks. Calling useEffect
without a second parameter is like calling componentDidMount and useState replaces React's state.
Check out their documentation for more information on that topic. A full example can be found at the bottom.
Skip waiting and reload the page
At this point, we're already showing some kind of message but we're not able to update to the new version. The code for this is pretty straight forward:
const reloadPage = () => {
  waitingWorker?.postMessage({ type: 'SKIP_WAITING' });
  setShowReload(false);
  window.location.reload(true);
};
Here we're sending a message to the Service Worker to tell it to skip waiting and become active and then we do a hard reload of the page.
Putting it all together, we should have a component that looks like the following.
Now you just need to include it somewhere in your application where it always gets rendered and you're done.
Very important: You have to disable caching for the /service-worker.js file. Otherwise, the browser will not install the new Service Worker and your update notification might never show!
import React, { FC, useEffect } from 'react';
import { Snackbar, Button } from '@material-ui/core';
import * as serviceWorker from '../serviceWorker';

const ServiceWorkerWrapper: FC = () => {
  const [showReload, setShowReload] = React.useState(false);
  const [waitingWorker, setWaitingWorker] = React.useState<ServiceWorker | null>(null);

  const onSWUpdate = (registration: ServiceWorkerRegistration) => {
    setShowReload(true);
    setWaitingWorker(registration.waiting);
  };

  useEffect(() => {
    serviceWorker.register({ onUpdate: onSWUpdate });
  }, []);

  const reloadPage = () => {
    waitingWorker?.postMessage({ type: 'SKIP_WAITING' });
    setShowReload(false);
    window.location.reload(true);
  };

  return (
    <Snackbar
      open={showReload}
      message="A new version is available!"
      onClick={reloadPage}
      anchorOrigin={{ vertical: 'top', horizontal: 'center' }}
      action={
        <Button
          color="inherit"
          size="small"
          onClick={reloadPage}
        >
          Reload
        </Button>
      }
    />
  );
}

export default ServiceWorkerWrapper;